Friday, July 1, 2011

Get chompin on some CORN CHOWDER!


It's one of those all-too-rare sweaty summer mornings in San Francisco where the fog ceases to exist (at least in the Mission) and all you can think about is getting to the beach...or at least Dolores Park.

If summertime makes me think of one food in particular, it would have to be corn. Delicious, fresh off the cob, raw, grilled, boiled, slathered in butter & chili...it's ALL good. The only question is what to do with it tonight. Well it's slowly popping up around here, so to get you started on fun corn-based meals, here's a great corn chowder I recently came up with. So long as you're using good corn - ie organic, non-GMO, fresh from the farmer's bin - you will love this recipe either cold or warm.

Summer Corn Chowder
serves 4-6

10 ears sweet corn
2 medium onions
3 ribs celery
5 sprigs thyme
1 tsp. salt plus more to taste
1 medium potato
4 cups veggie broth
3 strips bacon, chopped into small pieces

Garnish with:
Strips of roasted chile, chopped cilantro, diced avocado

Preparation:
Use a knife to remove the kernels from the corn, and set them aside.

Chop onions & celery into small dice. Bring a large pot to medium-high heat and add bacon. Allow bacon to brown on either side, then remove from pan and drain on paper towel. Add onions and celery to remaining bacon fat with a pinch of salt. Cook, stirring occasionally, until onions are translucent (not browned), about 5 minutes.

Meanwhile, peel and chop potato into small dice. Add potato and cook for another 5 minutes or so. Add corn and veggie stock, bring to a simmer and cook for another 10 minutes or until potatoes are soft.

Puree 2/3 of the soup with an immersion blender or in a blender or food processor until very smooth. Return to heat and season with salt & pepper to taste. Garnish with bacon and roasted chile, avocado, and chopped cilantro.

Wednesday, February 2, 2011

Filo wrapped deliciousness


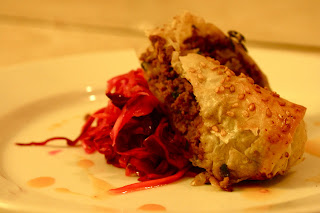
At last month's Sunday Suppering - the underground restaurant we put on once a month - we started off the 5-course meal with a bang. Call me crazy, call it heavy, but our first course was an individually wrapped filo log, bursting with sweet and savory cinnamony lamb, sitting atop a cabbage slaw with some harissa oil drizzled around. Oh boy.


It's true, I've been crazy for filo wrapped deliciousness of all sorts these days. While the filo is delicate and can be difficult to work with at first, it also can be molded into all sorts of shapes and is a vessel for whatever filling you're in the mood for, especially those with Mediterranean flavors. Brush it with egg or oil and sprinkle some sesame seeds over it, and when you pull it from the oven you have a golden brown crispy shell you can't wait to sink your teeth into.

This recipe is easy enough to prepare any day of the week, but fancy enough to serve to impress. *Don't forget to score the product before you put it in the oven if you plan on cutting it to serve - this will allow you to cut without filo crumbling everywhere. You can also roll this into one long log and serve as slices. Serve over cabbage slaw.


Lamb Filo Logs
makes 8 appetizer sized logs

1 lb ground lamb
½ cup toasted pine nuts
½ large onion, diced
2 cloves garlic, minced
1 tbsp olive oil + 1 small bowl with olive oil
1 tsp sea salt
½ cup white wine
2 tsp coriander seed
½ tsp fennel seed
½ tsp mustard seed
1 tsp cumin seed
½ tsp fenugreek
2 tsp ground cinnamon
1/3 bunch parsley, chopped fine
2 tsp chopped thyme
2 tbsp grated parmesan
¼ cup packed dried apricots, chopped well
1 egg
½ cup sesame seeds

On medium heat, sweat down onions, garlic & salt in a large sauté pan. Turn heat to high and add lamb, mixing well with the onions. Spread lamb evenly on pan and allow to brown, then break up mixture by finely chopping with a wooden spoon, so the lamb crumbles. Continue to brown, then add wine. Continue to simmer, allowing the wine to cook off. Once lamb is just cooked through and liquid is mostly cooked off, remove from heat.

In a small sauté pan on medium heat add coriander, fennel, mustard & cumin and heat until fragrant. Add fenugreek and cinnamon and remove from heat. Grind in a spice grinder. Mix lamb mixture with spices and all remaining ingredients.

Preheat oven to 400. Take one piece of filo dough and cut in half. (Always keep remaining filo covered with a slightly damp towel so it doesn’t dry when you’re working with another piece – if the towel is wet it will soak the filo, so make sure you wring it out well). Brush one half piece with olive oil, then put the other half on top of it and brush with olive oil again. Place one more half of filo on top and brush with oil. Cut oiled filo in half width-wise, so you have two squares. Place 1/3 cup lamb mixture in the middle of one square, pressing out so you still have 1” free on either side of mixture. Fold the outer edges in, then roll out creating a log. Bind the end by brushing oil over the end and the piece of filo it attaches to. Brush the top of the log with olive oil and sprinkle with sesame seeds. Repeat process until filling is done. Bake on an oiled sheet tray for 12-15 minutes or until browned.
makes 4 cups of filling

Cabbage Slaw

¼ head of cabbage, sliced thin
¼ head of red cabbage, sliced thin
½ carrot, julienned
1 rutabega, julienned
1 watermelon radish, julienned
1 inch green garlic, sliced thin cross-wise
1 tbsp sugar
1 tbsp salt
2 tbsp brown rice vinegar
2 tbsp champagne vinegar


Combine cabbage, carrots, rutabega, radish and green garlic with the sugar and salt. Mix well, and place in colander in a bowl. Weigh down vegetables with something heavy and allow to sit and drain for 15 minutes. Toss drained liquid and move veggies to the bowl. Mix with vinegars and weigh down again, for 15 – 30 minutes, mixing a few times. (vegetables can sit in vinegars for up to a couple of hours). Serve with filo wrapped lamb.

Monday, November 22, 2010

Good Old Punkin' Pie


It's that time of year again... Thanksgiving is rolling in and bringing with it the crisp air and pumpkins & squash showcased all around the city. Here on Alabama St. we're preparing to host Mara's family, and with that comes a grand meal on Thursday afternoon. We've got pomegranate/pistachio stuffing, Nanny's yams, a Heidi Hen Diestel Ranch organic turkey, Jared's brussel sprouts, and much much more.


One of my favorite things about fall is seeing the pumpkin patches along the coast - row after row of little orange globes popping out from the bed of green below them, and the different colored squash of all shapes & sizes around them. With thanksgiving coming up, what better way to use fresh pumpkin than making a delicious, homemade pumpkin pie. No need for the canned puree when you have these little gems growing all around you.


We made this pumpkin pie for dessert for our second Sunday Supperings, and it was a smashing success. Hope you'll enjoy!


Pumpkin Pie Recipe

Filling:
1 medium sugar pie pumpkin (to make 1 ½ c pumpkin puree)
½ c brown sugar
¼ c white sugar
½ tsp salt
½ tsp ground ginger
½ tsp ground cloves
2 eggs
12 oz condensed milk
cheesecloth

Dough:
1 ¼ C flour
¼ tsp salt
½ C butter chilled & diced
¼ ice water


Filling:
- Bake whole pumpkin at 400 degrees until very soft and slightly caving in. Open pumpkin, remove seeds (save if you want to roast after!) and scoop out filling.
- Place pumpkin into cheesecloth and strain out as much water as possible. In a blender, puree until very smooth.
- Mix pumpkin puree with the rest of ingredients.

Dough:
- In a large bowl combine flour & salt. Cut in butter with pastry cutter or fork until mixture resembles course cornmeal. Stir in water a tablespoon at a time until mixture begins to come together (you may need to add an extra tablespoon or two of water).
- Wrap in plastic and refrigerate for at least an hour, up to overnight. Remove from fridge and roll out dough to fit a 9” pie plate. Place crust in plate and press down bottom. Pinch edges all the way around the top.
- Blind bake crust under pie weights for 15 min at 400.
- Add filling & bake at 350 for 35 min, or until a toothpick comes out almost clean from the center.

Friday, April 16, 2010

eat LIVE & live healthy!


long before energy star appliances and stovetops that boil water in 60 seconds (that flat out scares me), we were somehow able to find means of cooking food that would not just taste great, but be great for us. we were also able to find creative solutions to actually cooking the food, like pickling and fermenting foods, so that they retained their original nutrients while gaining more and more good bacteria.

our bodies maintain a delicate balance of flora & fauna, but we are constantly killing off the good bacteria our bodies need to fight disease and keep us healthy. eating live, raw foods, such as yogurts and fermented foods, is helpful not just after a round of intense antibiotics (which kills the good stuff along with the bad) but also on a daily basis, to maintain that delicate balance. plus fermented foods just taste great. one of my favorite live foods is kimchi, a traditional Korean pickled vegetable dish. this recipe is a not-so-traditional one – I’ve added paprika for a bit of a smoky taste, and I didn’t bury it in my backyard while it fermented. but it tastes great and it’s simple to make. enjoy!


Kimchi of Sorts


2 heads napa cabbage, cored & thinly shredded
2 carrots, sliced in thin rounds
3 green onions, chopped
1 daikon radish, sliced in thin rounds
2 teaspoons fresh grated ginger
3 cloves garlic, minced
2 tablespoons salt
½ teaspoon paprika

Mix ingredients together in a large mixing bowl. Using a meat tenderizer or any other heavy kitchen tool, begin to pound down the mixture, releasing their juices and softening the vegetables. Mix well as you go. Once they begin to reduce in volume, transfer to a large jar or food-safe bucket and pound down further. Continue to press & pound down the mixture until its own liquid reaches an inch above the top of the mixture – if this doesn’t seem possible add water to cover. Place a lid on the jar but do not tighten. Sit unrefrigerated for at 5 - 10 days, or more or less to taste. Transfer to smaller jars (save some of the liquid, it’s filled with good bacteria) and refrigerate.

*Notes: I like to press down the mixture at least once a day to make sure the vegetables are consistently immersed). Also, try removing some of the kimchi after 5 or so days and refrigerating it, and allowing the rest to continue to ferment a while longer. See the difference in taste and decide which way you prefer it.

Monday, March 8, 2010


I remember the first time I saw a kumquat – it was in the Tel Aviv shuk (market) and they were piled high like a million mini-oranges. after I got over the initial shock that they are in fact called Kumquats – which I thought was a joke - I proceeded to pop one, then another, into my mouth. I remember the initial burst of sour as I crunched through the skin, which molded into sweet as the juices released. kumquats have since become one of my favorite fruits and I throw them on salads all winter long. they’re very versatile as they’re delicious whole, cut up, raw on salads, or cooked down into various sauces or chutneys. kumquats themselves are warming and help to alleviate phlegm, and are used in conjunction with ginger in Chinese medicine to alleviate coughs. this recipe came out of an inkling my lady and I had on a warm, late-winter evening a week or so back, when we decided it was time to get the grill going once again.

we woke up very early and headed out to the Monterey Fish Company at their wholesale location here in San Francisco on Pier 33. It was incredible to see crate upon crate of various fish – from tiny shiny night smelt to three feet long bass with mouths wide-open. Monterey Fish Company focuses on sustainable seafood and quality product, and we went in ready to get whatever type of fish they suggested. after a great tour of the facility and a little poking and prodding around, the fish mongers suggested we try Opah. Also known as moonfish, popular in Hawaii, this fish has a light flavor but meaty texture, so it was good for the grill. we came up with this chutney recipe to accompany the fish, and for the seasoning of the Opah we simply put salt, pepper, lemon zest & a little lemon juice on either side just before grilling. the chutney would be great with any fish that yields well to a citrus-y flavor.


Grilled Opah with Kumquat Chutney


¼ red onion, minced

apple cider vinegar to cover minced onions

2 cups kumquat

1 fennel bulb, sliced very thin

2 teaspoons minced ginger

1 teaspoon minced Serrano chili

¼ cup white wine

1-2 tablespoons agave (to taste)

2 teaspoons mint, sliced thin

sea salt


  1. Soak onions in apple cider vinegar to cover for 5 minutes, strain and set aside both vinegar and onions for use later.
  2. Sweat down fennel and ginger, chili & a pinch of salt for 5 minutes on medium heat. Add kumquats and cardamom and cook covered on medium-low heat for 5 minutes, allowing kumquats to soften.
  3. Add white wine and allow to cook off uncovered for another 10 minutes. Add 1 tablespoon of reserved apple cider vinegar, plus the onions and agave. Cook until mixture is bubbly and thickened, and the kumquats very soft. Add salt to taste.
  4. Remove from heat and garnish with mint. Serve over grilled opah or any meaty fish.

Thursday, February 19, 2009

appease your crowd with split pea soup

ahh, split peas.  those awful little green buttons which had me running the other way as a child the minute they were pulled from the pantry. the truth is that I don’t recall ever actually eating split pea soup when I was younger, though I know it was made in our house, so I’m pretty sure I dismissed them without ever giving them a chance. there are certain foods that I detested simply because of the name or color, not because I actually hated the taste, and split peas must be one of those foods.

but now I’m older and wiser, and it’s been many years since I’ve turned my nose in disgust to all foods green & healthy.  split pea soup is now one of my favorite winter foods – it’s hearty, packed with protein, and extremely easy to make.  this recipe can be tweaked a thousand different ways to give it a different flavor profile or to include whatever vegetables you have in your kitchen.  dried peas are wonderful for stabilizing blood sugar, plus they contain almost no fat and help to lower cholesterol.  they are packed with isoflavones, which are important phytonutrients (nutrients from plants) that are said to reduce the risk of cancer. 

this is the perfect soup for a rainy or lazy day, and it tastes even better the next day.  when reheating it you may want to add a bit of water as it gets very thick in the refrigerator. 

(a special shout out to Kambria Hooper, for providing the title to this entry)


Split Pea Soup

yields 4 servings


1 cup split peas

1 tablespoon extra virgin olive oil

2 large cloves garlic, finely minced

1 medium onion, small dice

1 medium carrot, small dice

1 stalk celery, small dice

1 tablespoon finely minced fresh ginger

1 small potato, small dice

1 bay leaf

5 cups water

1 teaspoon sea salt + additional salt to taste

1 teaspoon turmeric

½ teaspoon cumin

pinch cayenne

juice from ½ lemon

chopped parsley to garnish

  1. Measure out & wash split peas.  Soak covered in water for a half-hour to several hours. 
  2. In a large stock pot, bring heat up to medium and add olive oil.  Add onions & sweat until translucent, about 5 minutes.  Add garlic and stir for another 1 minute.  Add carrots, celery & ginger and stir infrequently, about 5 minutes until carrots soften.
  3. Add potato, split peas & water and bring to a boil.  Stir in the salt, turmeric, cumin & cayenne, and bring heat down to a simmer.  Simmer partially covered for 1 hour or until peas are soft.  Add more salt to taste, if necessary.
  4. Sprinkle with parsley and enjoy!  This is delicious with fresh bread & sausage.

Sunday, January 11, 2009

get your greens in

it’s winter time and no matter your location, you’re probably seeing a lot of dark, leafy greens in your local farmer’s markets.  my friends Roni & Adam received their CSA box this week from Mariquita Farms in Watsonville, CA.  the box was filled with greens of all sorts, from curly-leaf parsley to bitter mizuna, to broad, waxy leaves of collard greens. 

dark, leafy greens, such as collards, are extremely important in our diet.  they offer up the same amount of calcium as milk, without all the drama (pasteurized/homogenized milk is difficult to digest, filled with additives and hormones and all sorts of bodily fluids you don’t even want to think about…).  leafy greens are a wonderful source of iron, calcium, and vitamins A & C. 

my favorite way to prepare collards & other leafy greens is to chiffonade them then sauté on high heat for a short amount of time.  play around with them, they’re a wonderful addition to pretty much any dish you can think of. 

here’s a rough sketch of how we made these delicious eggs – a superb breakfast made with all local foods:

1.  remove the stems of the greens.  chiffonade by stacking them up, rolling tightly, then cutting into thin strips.

2.  heat a saucepan on medium-high.  add a small amount of butter, olive oil or coconut oil, and allow to heat up.  add greens with salt, pepper & a dash of red pepper flakes, and sauté quickly for about 5 minutes or until soft.  remove from heat and set aside.

3.  mix eggs with a touch of organic milk, salt & pepper.  heat up saucepan again with small amount of butter (unless pan is already greasy from the greens) on a medium heat.  once hot, add eggs and stir every so often.  after 3-4 minutes add greens and any other ingredients you like (we used farm-fresh goat feta & avocado).  continue to stir until eggs are almost completely cooked through and remove from heat.

4.  serve immediately & enjoy!